
Blog
How to Refinish and Paint Your Kitchen Cabinets
A step-by-step guide to DIY cabinet makeover projects
How to Refinish and Paint Your Kitchen Cabinets
Kitchen cabinets are the centerpiece of any kitchen, but over time, wear and tear can make them look dated or dull. Instead of replacing them entirely, refinishing and painting your cabinets is a cost-effective and rewarding way to give your kitchen a fresh, new look. Whether you’re a homeowner embarking on a DIY project, a designer seeking budget-friendly solutions, or a contractor offering services, this guide will walk you through the process of refinishing and painting your cabinets with professional results.
Why Refinish and Paint Cabinets?
Refinishing and painting cabinets have numerous benefits, including:
Cost Savings: A complete cabinet replacement can be expensive, but refinishing costs a fraction of the price.
Customization: Painting allows you to choose any color, texture, or finish, giving your kitchen a personalized touch.
Eco-Friendly Option: Refinishing cabinets minimizes waste by reusing existing materials.
Transformative Results: A fresh coat of paint can dramatically update the look of your kitchen without major renovations.
Materials and Tools You’ll Need
Before you begin, gather these materials and tools to ensure a smooth process:
Materials: Sandpaper (medium and fine grit), wood filler, primer, paint (latex or oil-based), and topcoat or sealant.
Tools: Screwdriver, paintbrushes, foam rollers, painter’s tape, drop cloths, and a sanding block or orbital sander.
Optional: Degreaser, paint sprayer, and new cabinet hardware for added flair.
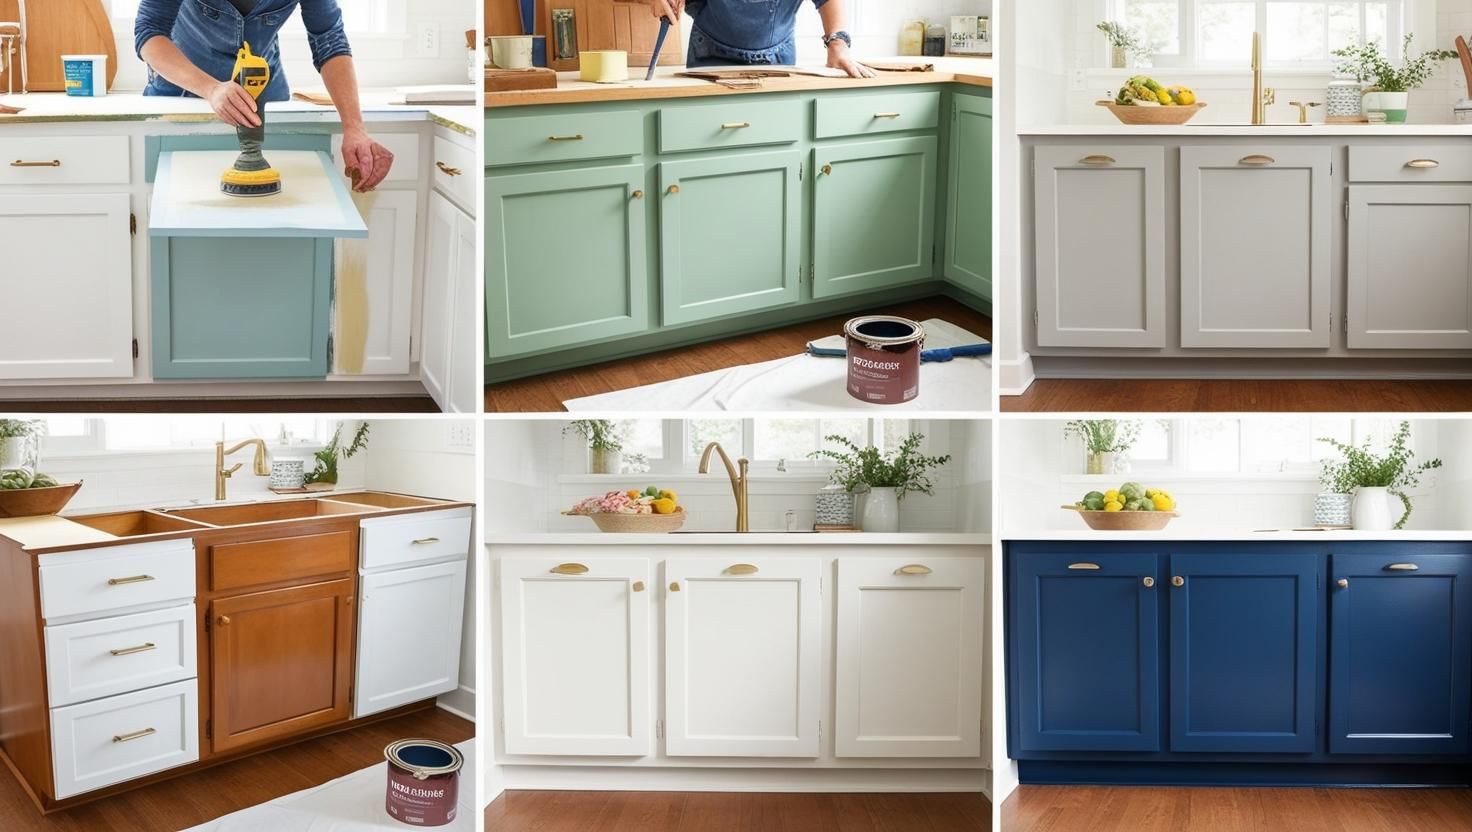
Step-by-Step Guide to Refinishing and Painting Cabinets
1. Plan Your Project
Decide on a color scheme that complements your kitchen’s design.
Choose a paint finish—satin and semi-gloss are popular choices for cabinets due to their durability and easy maintenance.
Set aside enough time; refinishing can take several days depending on the size of your kitchen.
2. Prepare Your Workspace
Clear the kitchen and remove cabinet contents.
Lay drop cloths to protect floors and countertops.
Ensure proper ventilation, especially if using oil-based paints or primers.
3. Remove Cabinet Doors and Hardware
Use a screwdriver to remove cabinet doors, drawers, and hardware.
Label each piece to make reassembly easier.
Store screws and small hardware in labeled bags to prevent misplacement.
4. Clean and Sand the Surfaces
Clean cabinets thoroughly with a degreaser to remove grease and grime.
Sand the surfaces to remove the old finish and create a smooth, paintable surface.
Fill any cracks or imperfections with wood filler and sand again for an even finish.
5. Apply Primer
Use a high-quality primer to create a smooth base for the paint.
Apply the primer with a brush or roller, working in thin, even layers.
Allow the primer to dry completely before moving to the next step.
6. Paint the Cabinets
Apply the first coat of paint using a brush for detailed areas and a foam roller for larger surfaces.
Let the paint dry according to the manufacturer’s instructions, then apply a second coat for full coverage.
For a professional finish, consider using a paint sprayer to achieve a smooth, even application.
7. Seal the Paint
Once the paint is dry, apply a clear topcoat or sealant to protect the finish and increase durability.
Allow the sealant to cure completely before reassembling the cabinets.
8. Reassemble and Add Finishing Touches
Reattach cabinet doors and drawers, and install hardware.
Consider upgrading to modern knobs or pulls to complete the transformation.
Refinishing Tips for Success
Take Your Time: Rushing can lead to uneven finishes and missed details.
Use High-Quality Materials: Invest in good-quality paint and primer for a longer-lasting result.
Test Colors First: Paint a small section or sample board to ensure you’re happy with the color.
Sand Between Coats: Lightly sand between paint and topcoat layers for a smooth finish.
Cabinet Refinishing Ideas
Bold Colors: Try navy blue, forest green, or black for a dramatic, modern look.
Two-Tone Cabinets: Pair light upper cabinets with dark lower cabinets for added depth.
Distressed Finish: Create a rustic or farmhouse vibe by lightly sanding painted edges.
Neutral Tones: Stick to whites, grays, or beiges for a timeless, versatile design.
Final Thoughts
Refinishing and painting your kitchen cabinets is a rewarding project that can transform your space without breaking the bank. With the right materials, tools, and techniques, you can achieve a professional look and breathe new life into your kitchen.
At www.kbyd.com, we offer expert advice and resources to help you tackle cabinet refinishing with confidence. Contact us today for more tips and inspiration